Monday, October 29, 2012

Spaghetti Brain (Braided Spaghetti)

Now if you're like me you are addicted to Pinterest... and that is exactly where I got this idea. There are plenty of things you can do with this to make it fun for Halloween. Like coloring the dough red or anything along those lines. Now this recipe isn't as picture heavy as our normal ones just for the fact that I was baking so many things at the time that I totally forgot to take some of the pictures. But this is something that is totally worth making. Everyone loved it and it was way easier than I thought it was going to be.

Ingredients:
1 loaf of frozen bread dough. (I used Rhodes)
6 ounces of spaghetti, cooked
1 cup of thick spaghetti sauce
8 ounces of mozzerlla cheese
Parmesan cheese
Parsley flakes


First thaw out your loaf of bread. Place some flour on a table and slowly roll out the dough until it's about the same size as a cookie sheet. This may take some time since the frozen loaf already has it's shape - but if you take your time with it, it will soon flatten out.


Once your dough is flattened out, lay it on a cookie sheet, and with a pair of kitchen scissors cut some slices on the edge; making sure they are about 1 inch thick tabs. We will be using these to make the braided look once the bread is full. Lay about half of the cheese down, then the cooked noodles, then the spaghetti sauce, and end with the remaining cheese.


Once everything is layered in on each end take your end tabs and lay them straight down over the spaghetti. Then take the remaining tabs on the side and slowly layer them over each other to make them look braided. Sprinkle with Parmesan cheese and parsley flakes.


Bake at 350 degrees for around 30-35 minutes. (Until the bread is a nice golden brown) Cool slightly and then cut into 6 pieces for serving.


Now, like I said there are many things you can do to this recipe to make it yours. Add pepperoni and do it pizza style. You could do chicken, broccoli, and cheese to veer from the Italian mood completely. No matter what this is something that will always be delicious, and the people you feed it to will believe that you spent a lot of time making them dinner! It's a win win situation.


Thursday, October 25, 2012

Peanut Butter Eyeballs


Makes approximately 4 dozen

These are delicious!  Big freaks love them because they are really cool looking and make a great Halloween party snack.  Little freaks love them because they can pretend to be all gross by eating eyeballs.  Also, who doesn’t love peanut butter?!?!?   AND, not only are they peanut butter, they are also smothered in white or dark chocolate and topped with a tasty chocolate button!  

Seriously, you CANNOT be human if you are able to resist this combination. You very obviously just stepped off the spaceship and are masquerading as an earthling, scanning our brain waves, lurking in the background, just waiting for the perfect moment to beam us up into your spaceship and imprison us in some sort of pod-shaped device, subjecting us to a horrific anal probing and other nightmarish procedures.  (I will pay you one million space bucks if you take the SOB first) 

Or perhaps you are a fanger trying to seamlessly incorporate yourself into the human world, trying so hard to be one of us by nourishing yourself from sterile bags of blood bank blood because you glamoured the night clerk at the local Red Cross location... Well,  let me tell you, any human worth their ounces in the red stuff knows that bagged blood just ain't the same for you vamps.  We are well aware of the fact that  one night you will succumb to your inner beast while sitting in a bar pretending to drink a glass of wine, pulsing jugulars surrounding you and taunting you, until finally they drive you over the edge, and there you go on a mass killing spree of horror and carnage. 

Yep, and now we know the secret to the exposure of nonhumans; peanut...butter...eyeballs...  I for one, plan on making lots and lots of these to carry around with me Halloween weekend.  I personally believe that walking up to a suspicious-looking stranger, shoving a peanut butter eyeball in their face and shouting, "show yourself demon!" is a perfectly reasonable and sane maneuver in the fight for humanity, and those jerks at the Acute Psychiatric Unit can go to hell...

                
 Ingredients
2 cups powdered sugar
1 cup creamy peanut butter
6 tablespoons butter, softened
1 pound white candy coating or almond bark
4-5 dozen brown candy coated chocolate buttons (M&M sort)

Icing
1 cup powdered sugar
1 tablespoon water
Red food coloring

In a mixer, combine powdered sugar, peanut butter, and butter.  Shape into 1 inch balls and place on a waxed paper lined cookie sheet.  Chill for 30 minutes.  (if you don’t have a mixer, just use your hands)

Melt candy coating or almond bark according to package instructions.  Dip balls in coating and place on waxed paper.  Place one chocolate button on each eyeball before candy coating hardens.  Let stand for 30 minutes until candy coating has hardened and set.

In a small bowl, combine powdered sugar and food coloring, adding more food coloring until desired color.  Add water in small amounts at a time until icing is desired consistency, not too stiff and not too runny.   Place icing into a plastic zipper bag and snip a very small corner off.  Use this as a piping bag to finish decorating the eyeballs.

Hints:
These can be made for other holidays also.  Simply substitute the white candy coating with chocolate candy coating and omit the decorations, or add other decorations more appropriate to the season.  You can even add a different color of food coloring to the icing and drizzle over them for a decorative appearance.

See you next week, fellow Freaks!  <3  Mama Lanette


Monday, October 22, 2012

Chocolate Spider Web Cupcakes

Cupcakes!?! Seriously, that is all you need to say to capture my attention. Whenever I see these heavenly little things, I secretly think, "mmm....CUUUUUPCAAAAAAKEEEEES!!!"  I will cut a bitch over a cupcake.  Imagine the power of the Hulk in the Avengers mixed with the excitement of Will Ferrell in the movie Elf right before he realized the department store Santa was a fake, and there you have it....cupcakes is serious business to me! The sad thing is, it's really hard to find a good cupcake in my town unless they are homemade. Our "specialty" bakeries that focus on them are not anything to brag about. Luckily, when I get to go see the BF in Wausau, WI, I get to hit up Sweet Lola's who has AMAZING and very creative cupcakes. (They have a Nutella one. Yeah, that's right, now I have you drooling.) All in all, though, we don't always have the time or energy to whip up a batch from scratch, and sometimes we feel a slight guilt about it. Nevertheless, you could also be one of those people where the idea of actually making cupcakes makes you giggle a bit inside as you relax with a glass of wine and a clean kitchen. In the end I have a recipe that works for everyone. It's a box mix with a little extra love added into it!


 Ingredients

1 cup of water
1 box of cake mix of your choice. As you can see, I quite obviously picked Betty Crocker's Chocolate Fudge
3 grade A large eggs
1 stick of non-salted butter
Cupcake wrappers
1 tub of white icing, found in any bakery area in your local grocery store


Melt the stick of butter in a large bowl.  Add the cake mix, eggs, and water.


Using a mixer, mix for one minute on low speed (or mix by hand until all batter is smooth). After that, blend the mixture for one minute on high (or find a big guy with muscles who can whip that up into a frenzy). You will see it start to fluff during the minute on high.


Now, in a cupcake pan, lay your cupcake wrappers down. Using either an ice cream scoop or melon baller, add your batter into the liners . If you have an ice cream scoop, do one scoop, for a melon baller, add three scoops. If you don't own either, use a spoon and fill them til they are half way full. (Don't feel bad if all you have is a spoon! That's all I had until I borrowed my friends melon baller. That thing sat in my purse for three days before I remembered to take I had it.) Bake the cupcakes at 350 for 10-20 minutes. Check with tooth pick to make sure cupcakes are done. To do this poke cupcake with a toothpick and once the toothpick comes out clean your cupcakes are done!


Once these are finished you should be seeing something along the lines of this. Those creases you are seeing are  because I had to do the three scoop option. If you have an ice cream scoop you wont be seeing those. But these puppies are going to have lovely frosting all on top of them so why do we care?


 Now, let's talk frosting. Feel free to just use store bought frosting if you want! But for me - I was trying to get these to taste as close to home made as possible. For the frosting I used Hershey's Perfectly Chocolate frosting recipe. I don't have a picture of the ingredients but I will set ya up nicely for this recipe.

Ingredients
One stick of butter
2/3 cups of cocoa (I used Hershey because it's what I had)
3 cups of powdered sugar
1/3 cup of milk
1 tsp of vanilla extract


 Put cocoa and butter into bowl and mix until creamy. Now take the powdered sugar and milk and add them into the bowl alternately, blending the whole time. Feel free to use extra milk if you need to. Once powdered sugar and milk aare completely mixed with the butter, add the cocoa and vanilla, and mix  well. Load this stuff onto your cupcakes and then use your tube of white icing/frosting to make the spider web look.


Thursday, October 18, 2012

Stuffed Pepper Jack-O-Lanterns


I must say, I really think this is a genius idea, and very sadly, not mine.  I think it is a great dish when trying to incorporate children into the meal making process.  Even 43-year-old Mama Lanette and the SOB get into the miniature pumpkin carving that this meal requires; who doesn’t love carving Jack-O-Lanterns this time of year, and seriously, stuffed pepper Jack-O-Lanterns?!? Madness, I say….madness!  Another bonus, these are far less messy and exponentially more delicious than their pumpkin counterparts.  Believe you me, this is one Jack-O-Lantern that will NOT sit out on the front porch after October 31, perched there day after day, slowly becoming a gelatinous, moldy, mass of goo that the entire family ends up fighting over right before Thanksgiving time.  Seriously, I am NOT cleaning that crap up, I do enough around here.  FYI:  Fortunately for Mama Lanette, the City of Minneapolis supplies an abundance of juvenile delinquent, pumpkin-smashing teens.  There is also a large population of ghetto squirrels that absolutely love Halloween time and all the glorious food left out on front porches for them to stuff into their little bastard squirrel mouths, making them extra nourished and strong so they can terrorize the dog all winter long.

Anyway, children or not, try this recipe.  It is fun, low in fat, and delicious! 


Ingredients
6 orange bell peppers
1 pound ground beef or turkey (I use turkey)
2 cups cooked rice
1 14-ounce can diced tomatoes (my favorite is Hunt’s Fire-Roasted)
1 rib celery, diced
1 clove garlic, minced
1 teaspoon dried basil
Salt and pepper to taste
Olive oil for sautéing


Preparing the Peppers
Slice tops off of peppers.  Scoop out seeds and ribs.  Using a small knife or pumpkin carving saws, carve as desired.


Preparing the Filling
Preheat oven to 350 degrees.  In a hot pan, brown ground beef or turkey.  Add celery, onions, and garlic.  Saute’ approximately 10 minutes, adding olive oil if needed so ingredients do not burn or dry out.

Next, in a large bowl, add cooked rice, tomatoes, and basil.  Mix ground meat mixture into the rice/tomato mixture.  Add salt and pepper to taste.  Stir until all ingredients are incorporated.  Spoon mixture into the prepared peppers.  Place tops back upon the peppers and place them into a baking dish.  Bake for 45 minutes to 1 hour, depending on how well cooked you want the peppers.  I like mine soft so I can cut through them with a fork, but some people prefer them to still have a bit of crunch.


On a side note:  These can be made year On round.  The orange peppers are not necessary, just fun for the Halloween season.  Green peppers are the traditional choice, and are FAR cheaper.  Stuffed peppers are one of those dishes in which everybody has “best” recipe, much like chili, sloppy joes, and meatloaf.  If you want to be creative, go for it.  Add some Mexican flare with chili powder, salsa, and black beans if so desired.  My mother always made her stuffed peppers with a  little bit of sour cream mixed in with the meat and rice (minus the tomatoes), giving them a stroganoff-like flavor, and then poured tomato juice into the baking dish, leaving it for us to ladle on top of the peppers after cooking. If you are looking for a vegetarian version, omit the meat and add some beans, or not, they are just as tasty with only the rice and veggies! 


Until next week,  fellow freaks!  <3 Mama Lanette


Monday, October 15, 2012

Deviled Eggs into Devil Eyes


The leaves have turned, the air is cool, and fall is here. I love fall. I love everything about it. And it holds my two favorite holidays; Halloween and Thanksgiving. As Mama Lanette already said we will be dedicating our blog for the month of October to Halloween, and let me tell you, I'm pumped!!! I started my Halloween cheer early this year at our local Zombie Pub crawl where I dressed like a zombie pickle. Yes, you heard right - and are seeing right - a zombie pickle. It was dill and it was kosher. The BF went as a zombie lumberjack which worked out well with his 6 foot frame and his Duck Dynasty-like beard. I wish I could provide more details on how exactly the crawl went, but this little pickle got pretty pickled, and the only thing I really remember is hitting up a local grilled cheese restaurant and eating something that was very, very delicious.

So, my first Halloween themed recipe is a play off of deviled eggs to make them look like eyes. Aka, Devil Eyes.


Ingredients:
6 grade A eggs
2 tablespoons of Mayo - I used mayo with olive oil
2 tablespoons of sour cream
1 teaspoon of yellow mustard.
Garlic powder, salt, and pepper to taste.
Paprika for dusting.
Can of sliced black olives.


Now lets talk boiling eggs. I know, it sounds weird. Most of us are just, "Well...you put them in water and boil. The end." My method is to boil them and walk away until I remember them. But there is a method for the perfect boiled egg. No egg white in your water. No green tint to the outside of your egg yolk. What you do is you place your eggs in a single layer on the bottom of your pot and add cold water until it's 1-2 inches above the eggs. Bring water to a full boil and then take off the burner and cover for 10 minutes. And there you go - perfect boiled eggs. I really don't see my self ever doing this unless I had someone to impress though! Haha.


 Now once the eggs have been boiled and cooled down (you can use a bowl of ice water to hurry that up), take the shell off of the eggs and cut them in half. In one container put the egg yolks in while leaving the egg whites in another container. Mix mayo, sour cream, mustard, salt, pepper, garlic powder, and egg yolks by mushing with a fork and then whipping with a fork until creamy. Feel free to taste to see if you want to add in extra of any ingredient.


Now to get the mixture into the egg whites there are plenty of ways you can go around it. You can use some cake piping and tips. This is if you want to get fancy with it and have one of those neat swoops. Now personally, this isn't really going to be needed if you want to add the eyes. We will be pressing them into the egg yolk mixture, so anything fancy will end up being messed up. What I did was use a half a tablespoon to scoop it in. With it being smaller than a spoon and a little more round it helped me get it into their nicer. You can also use a butter knife to help with any mixture that doesn't want to come out of the tablespoon. Lastly we are going to pop open that can of black olives and take out one slice for each egg and place it in the middle of the egg yolk area on the egg. This will be what makes them look like deviled eyes. Lastly, dust with paprika in any way you want and BOOM! You're done!


Thursday, October 11, 2012


The month of October, in “Mama Lanette and Alyssa JoJo World”, is best known for HALLOWEEN!  Many hours were spent when Alyssa JoJo was a tot creating and assembling Halloween costumes.  No plastic masks for my JoJo, oh Hell no!!!  It was carefully handcrafted costumes that included a catch phrase or nothing! A trick or treating route was also essential…did we want Bit O’Honey or a full sized candy bar?   My personal fuzzy-feeling favorite was the year that Mama Lanette and Grandma Joy made a bumble bee costume for Alyssa JoJo, and completely out of the blue, rather than saying “TRICK OR TREAT”, she said, “BEEEE YOURSELF!”  Oh, how I giggled…  Sadly, once the childlike delight in trick-or-treating was over, the next step for Empty Nest Mama Lanette was adult-themed Halloween parties and especially gross goodies to bring into work celebrations.  Halloween is a holiday that is plain FUN!  There are no family commitments, no gifts to be purchased, no formal anything…just…plain…old…fun…young and old alike.  If you want to participate…please do!  If not, shut your damn porch light off and stop confusing the cute little kiddies, for crying out loud!  For this reason, Feeding the Freaks is dedicating the month of October to the glorious gooey snacks, putrid potlock dishes, and treacherous  treats that only the twisted minds of Mama Lanette and Alyssa JoJo would research and spend the time to share with you.  See how much time we just saved you for your Halloween party menu?  Tune in over the next couple weeks…our goal is to get that gag reflex going.  

On a side note:  For those of you who live in a city/town who celebrates a Zombie Pub Crawl, please send us comment or photos of any especially disgustingly delicious drinks or appetizer/food products you encounter.  We would love to see them!!  J

Friday, October 5, 2012

Crock Pot Fiesta Chicken


Well,,,after being at death's door, I’m back! I suffered through family issues, a sinus infection, an eye infection, an ear infection, AND a bacterial infection. It’s that season here in chilly Wisconsin, so it was going to happen sooner or later. After whining heavily, spreading it to the BF, not being able to taste anything, and having an exhausted (and embarrassing) mental break down in front of my doctor, I’m feeling like a brand new Alyssa JoJo! Now I can focus more on doing what I do well, eating and cooking!!!

It’s come to the season where busy women bow down and show thanks for the creation of crockpots. I love my crockpot. If I could marry it I would. I got my first one from my mom after I turned 18 and it broke about a year ago, and I was a mess. Thankfully a good friend of mine just recently bought one that she never used and she gave it to me.

Yesterday when I was “working,” I “quickly” went onto a diet website that I use and saw that there was a thread about crock pot recipes. I've been seeing the words Salsa and Chicken used together a lot lately, which popped out at me because I love chicken and I LOVE salsa. I read a few things from people about it and it just was just laying some chicken on a bed of salsa in your crock pot and then eating it. Sounded simple and easy and I was totally down for the challenge. So...I put in some of Mama Lanette’s homemade salsa and some chicken breasts into the crockpot and let it go. And then I thought, “Why just chicken and salsa? So many things I love can be added into this to make this amazing.” I was not planning on having this on the blog but the heavenly thing that came out of my crockpot a few hours later was SO GOOD I just have to share it with everyone. So, while there is a lack of pictures, I promise this recipe is worth trying!!!  After I took my first bite, I proceeded to text everyone “Omg my food is soooo good.” I called Mama Lanette and told her about how if I could make love to food, this would be the dish that I would do it to.

Ingredients:
3 cups of salsa of your choice
3 to 4 decently sized skinless chicken breast
One 15.5 ounce can of black beans
10 ounces of frozen corn
Half of a bag of shredded mozzarella cheese
2 ounces of pepper jack cheese, cubed
8 ounces of sour cream.

Pour the salsa into the bottom of your crock pot and lay chicken on top. Cook on high until chicken is cooked all the way through. Remove chicken from crock pot and lay to the side and add in black beans and corn and continue to cook. Take chicken and shred into thin pieces. Place back into crock pot and add the mozzarella, pepper jack, and the sour cream. Mix well and cook high on half an hour. Mix again until all cheese is melted. Serve when ready for dinner.

Recipe Notes: I divided this up into eight cups serving wise. If you eat a cup of this it’s only 277 calories. The first night I ate it on a tortilla with some Frito chips. Tonight I will be eating it over a bed of rice. Really, there are many different ways you can eat this. You also can pick your favorite cheeses and switch them up. If you like spicy, I would suggest picking a hotter salsa – and if not, something very mild. Pick your favorite salsa and don’t be afraid of making this dish your own!

xoxo,
Alyssa JoJo

Wednesday, October 3, 2012

Tuna Casserole II

Today was the first below-60-degree day in Minneapolis since this past spring, which means the fall season will quickly be upon us.  Every year at this time, and after a good week of screaming in horror at the winter that awaits me and the associated Seasonal Affective Disorder that accompanies it, I race to the oven to bake up some of my favorite dishes that haven’t been tasted since last winter or early spring. There is nothing like a good ole’ carb coma (and a large supply of Mr. Riesling) to help one forget she lives in the Midwest in December or January.  While I love the flavors of summer, preparing the first casserole of the fall season always gives me a warm, nostalgic feeling inside (and don’t discount that carb coma!).  Who doesn’t remember a childhood of oven-baked dishes passed around the dinner table, warming our tummies and feeding our souls?  Also, turning the oven on doesn’t sound so bad when it isn’t in the 80’s or 90’s (Have I mentioned we don’t have central air?).

This particular tuna casserole is more than the basic cream of mushroom soup, can of tuna, box of pasta, mix it all up recipe.  I made that plenty enough when Alyssa JoJo was a tot, and it did us quite well during hard financial times; however, I occasionally like to play with my old recipes and see how far I can go with them now that a grocery shopping budget isn’t a major deterrent.  Alyssa JoJo mentioned the other night that she was making tuna hot dish because that is what she had the ingredients for, and I thought it would be a fine week to do the college budget vs. no budget comparison.

Ingredients:
1 pound box of noodles, whichever kind you prefer.  My favorite right now are the Cavatappi shape. Yes, I am aware that the SHAPE of the pasta does not change the flavor, but food should be fun, right?  If serving your child bowtie shaped pasta (remember, Alyssa JoJo?) makes a meal more appetizing for them, go for it.  Also, the Cavatappi and bowtie noodles hold up very well to baked dishes.
2 cans tuna, drained, or 1 large pouch of tuna.
10 ounce package fresh mushrooms, sliced
2 tablespoons butter or olive oil
8 ounces sour cream (1/2 pint)
3/4 cup half & half or milk
1 can cream of mushroom soup
2 cups cheddar cheese, shredded
1 cup frozen peas
1/2 cup fresh parsley, chopped (reserve a tablespoon or two for garnish)
3-4 green onions (scallions), depending on size, chopped

Bread crumb topping:
¾ cup bread crumbs
Olive oil or butter for drizzling

In large pot, cook pasta half of recommended cooking instruction time; ie., if the box calls for 14 minutes, cook pasta for 7 minutes.  It should be relatively firm and not cooked all the way.  It will continue cooking in the oven, and par-boiling it will keep it from getting overly mushy.

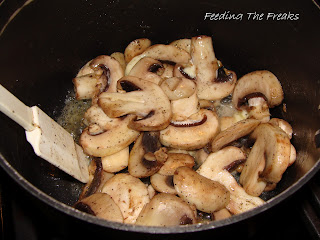
While pasta is boiling, in medium sauce pan or skillet, sauté mushrooms with 2 tablespoons of butter or olive oil.  The sautéing is optional, but gives a better flavor in the end result.

After the mushrooms are sauteed, turn off stove and stir in the sour cream, half & half, cream of mushroom soup, peas, parsley, and green onions.  Add black pepper to taste.  I don’t add any salt because I think the cream of mushroom soup adds plenty on its own, but do what you want to do, you know you will anyway....


After pasta is cooked and drained, combine with mushroom/cheese/soup mixture.  Pour into oiled casserole dish.


The finishing touch of this recipe is the bread crumb mixture that goes on top.  It just adds a little extra delicious crunchiness to the dish.  Spread 3/4 cup bread crumbs (really, as much as you prefer) and drizzle with olive oil or melted butter.  Sprinkle with reserved parsley.  Cover casserole and bake at 350 degrees for 20 minutes.  Remove cover and bake for another 10 minutes or until bread crumbs are browned.  You can also broil for a couple minutes for quick browning.


Mmmmm......


Suggested Pairings:
Fresh green beans or a lovely salad, anything that is light and vibrant tasting.

Tip:
This freezes well, and if there are only a couple of you in your household, go ahead and split it up into 3-4 portions and wrap in foil or a freezer container.  Believe you me, there will be more than one occasion this fall when you come home after a long day at work, or napping the SAD away, and do NOT feel like cooking.  Just go ahead and remember that frozen tuna casserole all waiting there to be heated up, and rejoice in the fabulous that is you and your think-ahead, can-do attitude!

 This recipe has been S.O.B. approved.  Take THAT, Alyssa JoJo!

Monday, October 1, 2012

Oven Dried Tomatoes

Wondering what to do with all those cherry tomatoes bursting from the vine in such abundance that painful acid-crack mouth is now forcing you to slow it down a bit?  Try drying them!!!  I, Mama Lanette, am an absolute FREAK with anything involving the beloved tomato, be it fresh, canned, salsified, or dried.  Over the past few years, I've learned how to dry my own rather than paying the exorbitant prices in the grocery store, and I shan't ever go without dried tomatoes again!  *insert maniacal laugh*  The process is extremely simple, and although it does involve a lengthy amount of time, 12 hours or more in the oven, the prep itself is no more than a half hour or so.  The drying process can easily be done overnight, on a  Saturday or Sunday when the oven is not needed for other items, or in the oven during the day while everybody is at school and work, which is ideal if you live in a house that is NOT in constant fear of something exploding, crumbling, or generally falling apart.

Now, what about those food dehydrators, you ask?  NOISY!!! HARD TO CLEAN!!!  Have I mentioned the lack of dishwasher in my home?   I have a beautiful dehydrator purchased for me by the S.O.B., as he once had visions of fruit leather and dried bananas dancing in his head.   Yes, it is a convenient appliance, but if I am at home for 12 hours drying my tomatoes, I do NOT want to listen to a dehydrator fan kicking on and off every hour or so.  I live in a house that contains two human occupants, one canine occupant, my makeup, and my clothing, and nothing else.  Bitch, please, I will cut you if you try to remove my can of Kenra hairspray or my special stash of body shapers from this residence to make room for something as necessary as a first-aid kid, and I am NOT making room for that noisy ass dehydrator.  There is not one square foot of available space for those rich-people things like a “let me stick that dehydrator in the spare room so the constant whirring doesn't make you want to stab someone” kind of room, an “oh, let me run down to the deep freeze and grab that zucchini  bread for you” sort of basement, or “oh, you just stay right there, sweetie, I’ll pop right down to my canning fridge and grab you those jars of refrigerator pickles and pickled herring you love so much, dontchaknow” .  Noooo sirree!!  This is a house of very careful maneuvering and extremely critical organization, and the tiniest thing can cause the entire ecosystem to collapse and/or implode in a mushroom cloud of tasty delights.   With that being said, I guess I am not a fan of food dehydrators per se’.  So, check out these three simple steps that will supply you with an entire fall, winter, spring, and first half of summer of delicious dried tomatoes that you will use in dips, sauces, marinades/dressings, etc. all year round. 

Oven Dried Tomatoes
Pick cherry tomatoes and wash (discarding any stems or leaves). Dry as thoroughly as possible, as every drop of water will increase the drying time.

 Cut tomatoes in half and place cut-side up on a baking sheet lined with parchment paper or aluminum foil.  (This only cuts down on cleaning time, so is optional…I just hate doing dishes and have found every trick in the book to reduce the amount of kitchen items that require washing)


 Place in a preheated 170 degree oven for 10-14 hours, depending on size of tomatoes used.  The bigger the tomato, the longer the drying time.  The tomatoes should be raisin-like in consistency when done.  


Once the tomatoes are dried and completely cooled, you have a few options for storage:

 Place tomatoes in a freezer bag and store in freezer (lasts for the year up until next drying if double wrapped).  THIS IS MY PREFERRED METHOD, but that’s just personal, I guess.
 Store in a glass jar with olive oil, use within 2 weeks.  Best kept in refrigerator to prolong freshness.  For extra deliciousness, add a minced clove of garlic to the mix.
 Place in an air tight container and store in refrigerator.  I don’t recommend this option unless using in the next couple days, as I have had fuzzy surprises awaiting me when storing in this method.