Saturday, March 30, 2013

Haaaaaaaaaaaaaaaaaaaaaaam!

Hey Everyone! Happy (early) Easter. Alyssa JoJo here with a short and easy recipe for ham for the crock pot! Lets get to it.

Ingredients:
6-8 pound ham. (We accidentally bought already pre-cut ham but it made no difference.)
1 can of Coca Cola
1/2 cup of brown sugar
3 tablespoons of dry mustard
Molasses


Now just pour that can of coke right into the crock pot. See... look at how easy that first step is.


Now take that jar of molasses. Now what I did was pour some into a bowl and dipped my fingers in that sweet dark syrup and rubbed it all over the ham. Gave it a nice good massage. Add enough to make sure the ham has a good goopy dark tone to it.


Now mix that brown sugar and that dry mustard together in a clean bowl. Once again just dip your hands into that and rub/pat it onto your ham. I go a little easy until I make sure that the full ham is covered, and then cake the rest on. (See! Again look at how easy that is!)


Now just stick that ham into the crock pot and cook on low for 6-8 hours. BAM HAM! Sorry, no finished pictures from just pure laziness and righteous hunger!  Have a fantastic holiday!


Thursday, March 28, 2013

Easter Extravaganza!


Welcome to Easter Extravaganza on Feeding the Freaks!  Theserecipes were truly meant to be out earlier this week for those of you who wanted to try them this weekend for your Easter meals; however, I got extremely time crunched, and as the saying goes, "better late then never".  Alyssa JoJo will be posting her famous cola glazed ham that she makes, and I will also be making for my Easter Feast this weekend for family and friends.  I am also providing some side options, all of which will also be on my Easter Feast table this weekend, so you, my freaks, will be eating what Mama Lanette is eating.  How lucky are you! Okay, let's get this freakshow on the road! 

FYI:  I also made a crab/shrimp deviled egg recipe this week, which I wanted to post, but I feel it needs some tweaking before I can share.  I will post as soon as I perfect :-)


Alyssa JoJo’s Precious Cheesy Garlic Biscuits
Makes 12

I created this recipe a good 15 years ago for my precious Alyssa JoJo, and to this day it is still one the top most requested things for me to make her.  It is similar to the biscuits at Red Lobster, but I like them even better.  I started making double and triple batches so I could send extras home with her and her friends, a couple of whom were quite excited to hear I was posting this.  

Let’s discuss garlic, shall we?  I highly recommend making an investment in a garlic press.  It will cost you anywhere from $10-20, and they last almost forever.  Now, the garlic itself…a head of garlic costs approximately 25 cents.  Yes, a whole quarter of a dollar.  The head itself contains several cloves, more than 10, and most recipes call for 1-3, so right there you have 3 recipes at minimum for 25 cents.  Also, the taste of fresh garlic is so worth the extra (minimal) effort of pressing it yourself, it will truly convert you once you try it.  A head of garlic also lasts a long time, much like onions, so you can buy one and store it in the fridge or on the countertop and use it as needed.  The jarred minced garlic is also an option; however, it just doesn’t hold up the same if you ask me.  Go ahead and use it, though, if that is what is most convenient for you.  Keep in mind, though, when comparing jarred versus fresh garlic, the fresh is far more cost efficient and has a tastier end product.
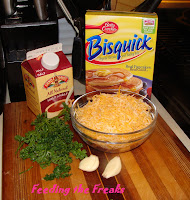
Ingredients
2 cups Bisquick
1 cup milk
2-3 cloves garlic, minced or pressed.  Do NOT use garlic salt.  You can use jarred minced garlic if you want, and even garlic powder if you must, but do not use garlic salt.  It will destroy the biscuits to the point where you won’t even be able to eat them.
2 cups cheddar cheese, shredded (sharp cheddar works best, but you can use whatever you prefer)
1/2 cup fresh parsley, chopped (or can use ¼ cup dried parsley)

Preheat oven to 450 degrees.   In a bowl, add Bisquick, garlic, and milk.  Combine until barely mixed.  Add cheese and parsley.  Combine until mixed, but still lumpy.  Do not let it get smooth like pancake batter.  Let it stay lumpy like muffin batter. 

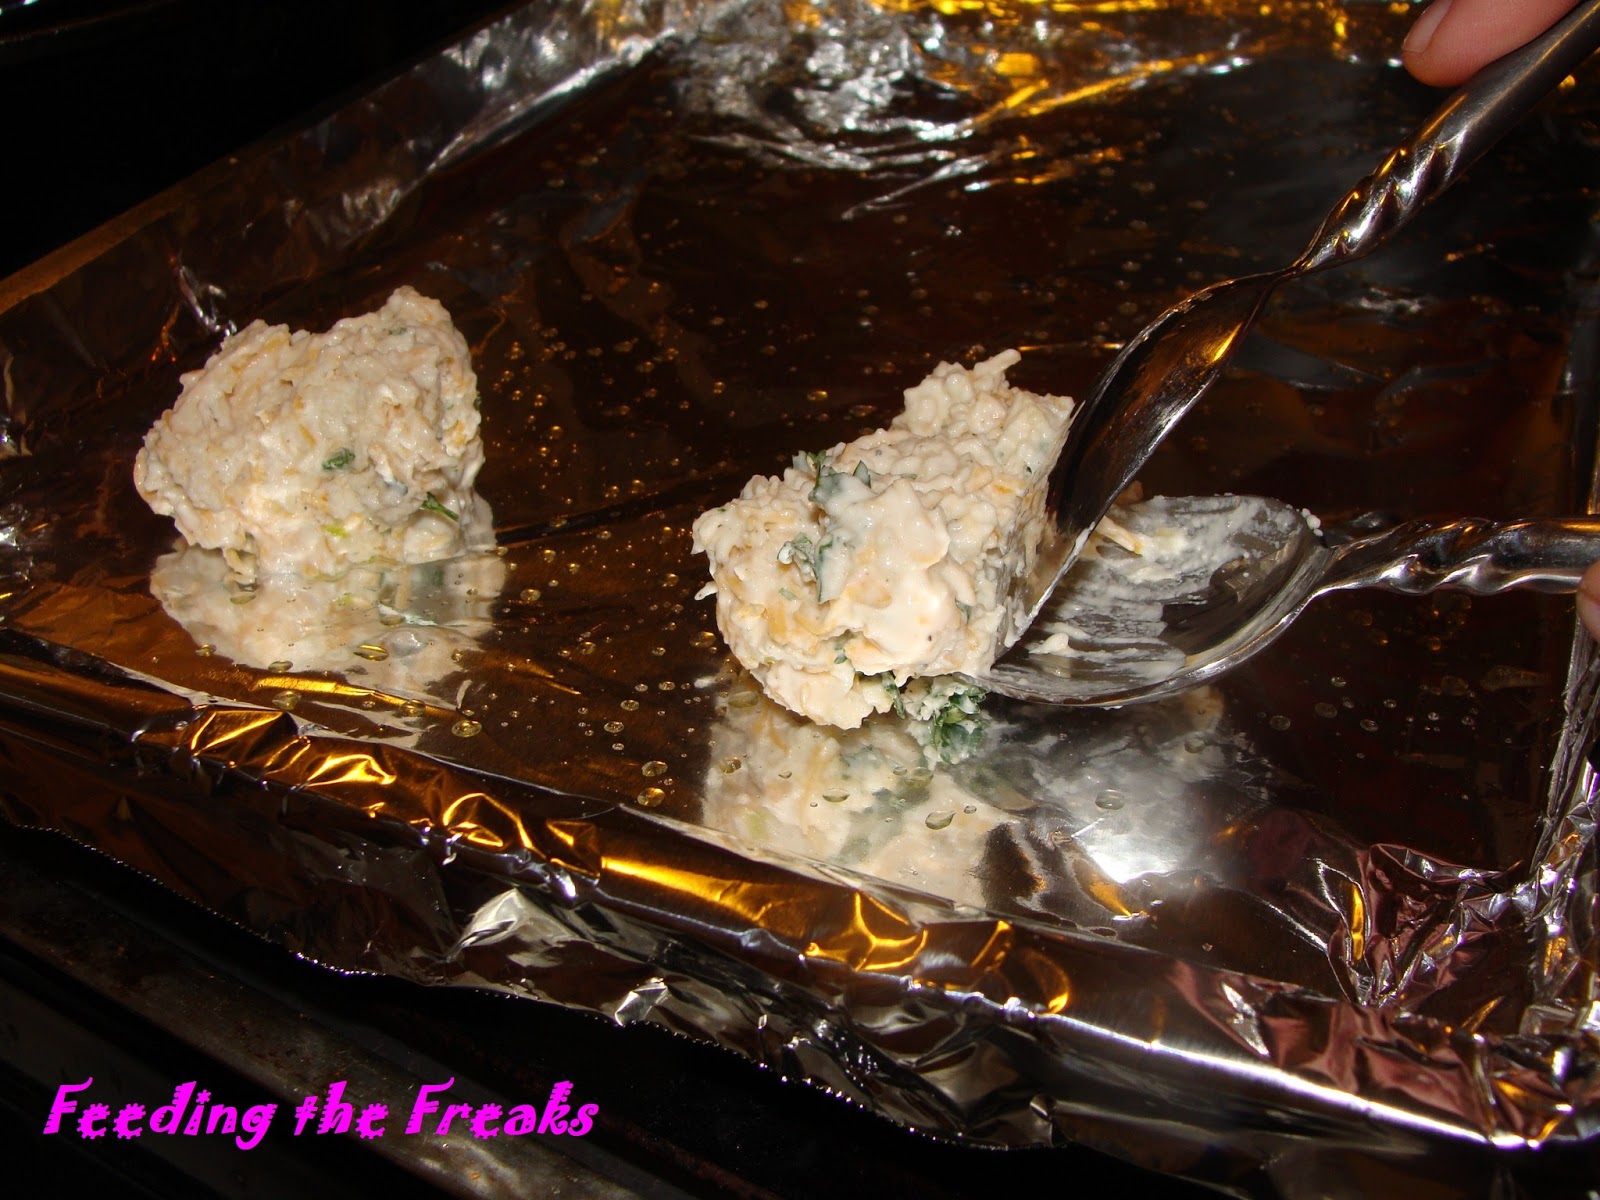
Take a spoon and scoop up some batter.  Use a second spoon and use it to push the batter onto a baking/cookie sheet. (see photo) These are not rolled biscuits, they are drop biscuits, part of what makes this recipe so perfectly easy and beautiful.  I would suggest a cookie scoop, but alas, the batter is too sticky…

Place the biscuits in oven and bake for 15-20 minutes, until tops are browned.  Y’know, some people just like things more browned and baked longer than others, so I will leave that up to you.   If you aren’t sure, take one out, break it in half and take a taste.  If you don’t care for it, put them back in for a few more minutes, ‘nuff said.  See how easy that was?  See how amazed your family of bit, tall, and small freaks are, eating these spectacular freshly baked goods you made just for them?   Try it, and as always, let us know how it went!

Tip:  These work really well with other flavor variations.  Are you having Italian for dinner tonight?  Add Parmesan cheese and basil instead of parsley and cheddar.  I’ve also made them with pepperjack for a little extra kick.  Have fun and experiment.  They are even easy for the kids to help make if you want to get them involved in the cooking process.


Cornbread with a Kick
Makes 8 mini loaves or 12 muffins

Many people are shocked when I tell them I use a premade cornbread mix, but I say, what the heck?  I have made, and will continue to make, cornbread from scratch occasionally, but when an occasion arrives that requires baking multiple items, or a last minute dinner party comes up, you can’t go wrong with the premade mixes.  They are cheap, approximately 50 cents, taste great, and I’ve never had any complaints.  In fact, when I add my special additions, people are always amazed when I tell them I used a premade mix.  The SOB loves a good cornbread, and my goal is to one day duplicate the luscious creation from Famous Dave’s.  Until that time, this is a decent runner up in his mind. 
 
Ingredients
3 packages Betty Crocker brand cornbread and muffin mix
1 cup milk
6 tablespoons butter, melted
3 eggs
1 cup cheese, shredded (I used sharp cheddar, but you can try pepper jack if you want)
1/3 cup jalapenos, chopped small
Honey for drizzling

Preheat oven to 400 degrees.

In a bowl, crack eggs and beat slightly until yolks are broken.  Add cornbread mix, milk, and butter.  Stir until just combined.  Add cheese and jalapenos and mix gently.  You don’t want to over stir, or the cornbread will be tough.  As soon as it is mixed, you can stop.  Lumps are OKAY, I promise!

Evenly divide batter amongst an 8 compartment mini loaf pan or a 12 compartment muffin pan.  I used an 8 mini loaf pan in the photos for this recipe. (I secretly love the idea of eating an entire loaf of bread, even if in mini form)  If you are not using muffin or cupcake liners, generously grease the pans before pouring the batter.  I prefer using plain old Crisco over Pam.  A small can costs only a couple dollars and lasts quite a long time. Pam just seems to destroy my bake ware.  It gums up the surfaces and is a bitch to scrub off.  I even bought the Pam for Baking once, and nothing rose, all the frigging muffins were all sunken down like “I” did something wrong.  I did this more than once, and I know for a fact it was the Pam for Baking, and not me, so there!  Just not worth saving the two minutes it takes to grab a paper towel, dip it in Crisco, and rub down the baking pans. 
 
Bake for 15-20 minutes.  To determine doneness, stick a toothpick in the center at 15 minutes.  If it comes out clean, the muffins/loaves are done.  If there is batter stuck to the toothpick, bake another 2-3 minutes and check again.  Tops should be slightly browned.

After removing from oven, let cool for a few minutes and remove from pan onto a baking rack.  While still warm, drizzle some honey on top and spread with a knife or basting brush.  Serve immediately, or let cool and store in a plastic bag or container.  These freeze well, so feel free to double the recipe for future feasts! 

Tip:  If you don’t like the heat of jalapenos, use mild green chilies (or less jalapenos).  If you want more heat, add more jalapenos or a hotter pepper.  You can tweak this to suit your own tastes.  I have also at times thrown a cup of corn kernels (canned or frozen) in with the batter to give it some extra texture, but I don’t always have corn on hand.  It tastes just as good with or without it, so do whatever you prefer.


Super Pop Popovers
Makes 6

Popovers make me happy!  They are so yummy, crusty, steamy, and custardy, and just mmmmmm…..  If you’ve never had one, you have no idea what I am talking about.  How can something be crusty and custardy at the same time?  You just have to make them and see for yourself!  This recipe makes super pop popovers; popovers that are a little bit bigger than the norm.  All the more popping over and steamy airiness waiting to delight me and make me giggle like a small child.  They are relatively easy to make.  A lot of people are afraid to make popovers, and I don’t know why.  It may have to do with the two tiered baking, 20 minutes at 450 and a second 20 minutes at 350.  Let me tell you though, the SOB can make popovers, and if he can make them, you can make them.  He has honed his culinary skills quite a bit over the past couple years, but still…he was able to make these first time without any help whatsoever, and they turned out perfectly.  Try them and discover the beauty of the popover!

Ingredients
1-1/2 cups flour
1-1/2 cups milk
3 eggs
1-1/2 tablespoons butter, melted
3/4 teaspoon salt

Preheat oven to 450 degrees.  Grease muffin or popover pan generously.  (I truly prefer and recommend using regular Crisco over Pam spray)

In a bowl, add eggs and beat until yolks are broken.  Add remaining ingredients and blend until smooth.  Fill muffin or popover cups evenly.  Bake at 450 degrees for 20 minutes.  Bake at 350 degrees for another 20 minutes.  For the bestest, steamiest, custardiest results, serve immediately with butter. *dying inside*

There are a lot of things you can do with these as far as additions, but I am a pure popover person.  The world wide web, however, offers many sites that have popover flavor variations if you want to kick things up a notch. 


Spinach Strawberry Salad

This is my favorite salad in the whole wide world…yummmmy!!!!!  I even eat it for breakfast, and quite often.  Why the heck not?  It has spinach, strawberries, cheese, and walnuts, a perfect power punch to jumpstart your day.  It is one of those food combos that literally makes me feel good.  The onion can get a little overwhelming, but I have a note in the assembly instructions about that, so be sure to read on.  It goes perfectly with chicken, ham, turkey, frittatas, beef, etc.  Enjoy!  Yummy yummy yummy!

Ingredients


1 6 ounce bag prewashed baby spinach
½ pound strawberries, washed and quartered or sliced
¼ medium red onion, very thinly sliced, and then halved
4 ounces feta cheese, crumbled
½ cup walnut halves or pieces
Fruity vinaigrette such as Salad Girl Pomegranate Pear, Ken’s Raspberry Walnut, Marzetti Simply Dressed Pomegranate, etc., anything that is a fruit based dressing.

In a large bowl, add spinach.  Top with strawberries, onion slices, feta, and walnuts.  Word of caution, red onions are fairly strong, and you more than likely will not use all of the slices that you cut up.  Use your best judgment when adding these to the salad.  Same with the cheese and walnuts, if you prefer less or more, use less or more. 

Immediately before serving, add vinaigrette and toss to combine ingredients.  Another serving option is to place the salad onto small individual plates and drizzle the tops with vinaigrette.  


Friday, March 22, 2013

Corned Beef with Guinness Au Jus...and MORE!


Hello fellow freaks!  I have several recipes this week for our Irish Feeding the Freaks Festival of Food.  Yes, I am quite aware that St. Patrick’s Day was on March 17, and it is now well past that date.  However, I had a penchant for making a corned beef brisket this year, and have not made one before.  I also had plans to visit my Irish granny and aunties the weekend of St. Patties and wanted some sage advice before I proceeded.  

After much in-depth questioning, I followed the guidance of the liquor store clerk (from whom I purchased my Guinness) on the marinating, heard about an SOB friendly sautéed cabbage and egg noodles from one of the aunties(it had bacon in it), was lucky enough to partake and remember the delights that honeyed carrots have to behold from Cuzzy Clare Bear, took bits and pieces of this and that from here and there, and created something that I hope you enjoy next year.  I personally take great pride in my Guinness Au Jus.  It is something that a little Leprechaun whispered into my ear, and it very annoyingly would not leave no matter what other ideas I came up with.  I am glad I stuck with it, as I feel it is really extraordinary, and it helped convert more than a couple corned beef “haters” into “lovers”.  Granted, those people have memories of the dreaded boiled corned beef, cabbage, carrot and potato dinner…*shudder*….  So here we go…read on for Mama Lanette’s St. Patty’s Day (and the day after) Recipes!

Corned Beef with Guinness Au Jus (AKA Candied Corned Beef)
(I did not take any photos of this, as it is pretty simple and just thrown into the crock pot.  However, I am always welcome to questions or advice, so if you need assistance or have questions, please ask!  Okay, fine, I forgot to take photos of this part, but still…it was really easy, but if you need help, please ask.  I seriously don’t mind, and I love helping people get their cooking mojo on.)

2-3 pound corned beef brisket
1 can or bottle Guinness Stout
Seasoning packet that comes with the corned beef brisket
2 Bay leaves
2 cloves garlic, minced
1 small onion, diced small

Remove corned beef from packaging and pat dry with paper towel.  Place into a plastic zipper bag and sprinkle with contents of seasoning packet.  Pour Guinness into bag.  Let marinate anywhere from four hours to overnight. 

Add entire contents of bag into crockpot.  Add Bay leaves, garlic and onion.  Set crock pot on low for 8-10 hours, or high for 4-6 hours.

Remove corned beef from crock pot and place on plate.  Loosely tent foil over brisket to keep warm, allowing to stand for at least 10 minutes before cutting and serving.    Cut the brisket into 1/2 inch thick pieces diagonally across the grain. 

While brisket is resting, prepare Guinness Au Jus:
Juices from crockpot, strained
½ cup brown sugar
2 tablespoons frozen apple juice concentrate
Salt and pepper to taste

Add all ingredients into a sauce pan.  Stir well until brown sugar and apple juice concentrate are dissolved.  Turn stove onto high and bring ingredients to a boil.  Reduce heat, but keep mixture at a rolling boil.  Cook until reduced by half.  Serve as a dipping sauce or spooned over corned beef.  The au jus should be thin in consistency and not gravy like. 

Tip:  Store leftover corned beef in a container with au jus.  Use the leftovers for a Reuben sandwich that will blow your mind (hence, the candied corned beef). This is the first time I have made this, and the SOB was NOT looking forward to his first corned beef and cabbage dinner.  He really, really, really, really was not.  Let me tell you this, we have no leftovers.  We had literally enough to make two Reuben sandwiches the following evening (see photo below).  Not only that, I was racing around the Twin Cities on March 21 looking for corned beef so I can make another one for him because he loved it SO much, he looked at me and asked in a childlike voice, “will you make this again?”  How can a freak who loves to cook say no to that?  That is the ultimate compliment, in my opinion; expecting “it was okay” and getting “make me more!” is what makes us cooks rock and roll! 

Irish Cabbage and Noodles
4 ounces egg noodles
½ pound bacon, chopped (bacon was originally my only selling point for this entire meal)
1 medium onion, chopped
1 medium head cabbage, shredded
Salt and pepper to taste

Cook noodles according to package instructions.  Sauté bacon.  Using a slotted spoon, set bacon aside, reserving drippings in the pan.   Sauté onion in bacon drippings until tender.  Add cabbage and cook until warmed through.  Add bacon and noodles.  Toss to combine.  Add salt and pepper to taste.  Cook to heat through.  If this is too rich tasting for you, add 1 tablespoon red wine or apple cider vinegar.  It will brighten it up amazingly well.
 
Honeyed Carrots
1 12 ounce bag baby sweet carrots
¼ cup parsley, minced
2 tablespoons butter
¼ cup honey
Salt and pepper to taste

Place carrots into a sauce pan and barely cover with water.  Bring to a boil and immediately reduce to a simmer.  Cover and cook until crisp tender, approximately 10 minutes.  Begin checking them at 5 minutes, and every couple minutes thereafter, as the size and cut of the carrots determines the cooking time.

*If using regular carrots, peel and cut into dimes, or julienne, or do whatever you want.  Just pay attention to them while they are cooking in the water.  You don’t want to overcook them during this part, as if they finish during the water cook, they will be overly mushy by the time they are done with the honey and butter. 

When carrots are cooked, drain excess water and add butter and honey. When thickened to a syrupy consistency, add parsley, salt, and pepper.  Serve and enjoy.


Reuben Sandwich
Sliced rye bread
Corned beef
Swiss cheese, deli sliced
Sauerkraut, strained of liquids
1000 Island Dressing
Butter or Olive Oil


Close your eyes and picture making a grilled ham and cheese…butter or oil the outside of the rye bread.  On the inside, very lightly spread a smear of the 1000 Island dressing (or forgo it, many people do…there is no 1000 Island dressing shame here, people).  Stack the Swiss cheese, corned beef, sauerkraut, and more Swiss cheese.  Cook on medium-low to medium heat until all buttery, crispy, and meltiluscious.  If you soaked your leftover corned beef in the Guinness Au Jus, reheat and use it as a delightful dipping sauce!  These are messy sandwiches, so careful and gentle attention in preparation is your best friend.  

Wednesday, March 20, 2013

Dublin Coddle


Hey Everyone Alyssa JoJo here! I hope you all had a good St Patties day weekend. I know I did! Saturday we went to go visit some family for my Irish Great grandma’s birthday. We watched an old slide show of pictures from when my great grandma was younger all the way til when Mama Lanette was younger. (Nice perm Mom!) We also got to eat some very delicious mini four leaf clover cakes made by my cousin Claire Bare. These things were AMAZING! We had a cupcake that was very similar to what she made from a local cupcake shop which couldn’t even compare to these things.


Sunday we didn’t go out or anything, but instead BBB (Big Burley Bruce) and I stayed in and I made a traditional Irish meal out of a cook book that I got handed down to my by my Great Grandma. I have no idea how old this book is, but I had to do some Google research to covert the measurements and also to get a clearer look at how exactly to make it. Now I did make some small changes, which I will mention in the recipe. I don’t feel like I did anything that would change this from being a good ol’ traditional recipe, and let me tell you, this recipe doesn’t need much changing. It was DELICIOUS! Good enough where BBB went up for a big bowl of seconds. And if you really want to call out the Irish in you I suggest you sop up what’s left in your bowl with a nice piece of soda bread.


Ingredients:
8 pork sausages (We used hot Italian sausages for some heat)
1 pound of bacon (We used double smoked bacon that Mama Lanette brought us)
2-4 pounds of potatoes
2 large onions
2 cups of beef broth or water
¼ cup of parsley
Salt and pepper to taste


 First what we are going to do is cup up the bacon and sausage into bite size pieces. I did 1 inch by one inch for the bacon and did the sausage in a little larger of chunks. You’re going to want to make sure that these are easy to eat – this meal shouldn’t need a knife!


 Now take the onions and cut them into chunky pieces. We aren’t going to finely dice these like we would in most recipes. What I did was I quartered the onions and then just cut some half inch wide strips.


 If you look up the old recipe online you’ll see that they will have you boil your meats as a start, but I went a different rout. In a pot I fried up the onions, bacon, and sausage together dry. Now your bacon will look different during this process with the way this recipe goes. Normally we get some what crispy bacon that becomes a brown/red. Don’t be worried if your bacon holds its pink color through out this process.


As your meat is cooking peel your potatoes and chop them into bigger chunks. Something bite sized. I did them a little bigger than what I cut the meat. Put the potatoes off to the side, we won’t be cooking these ahead of time. Make sure to check your meat often during this process. We don’t want anything to burn.


Take your parsley and finely chop it. I normally use my kitchen scissors when doing this because I find it to be easier and cleaner than using a knife.  Again, keep checking your meal and stirring it around.


Once the meat is cooked to your liking add in potatoes, parsley, two cups of beef broth, and salt and pepper to your tasting. You’re then going to cover the pot on the stove and let it simmer for about an hour. Make sure to check it through out the meal. We want to make sure that while the potatoes become soft you don’t want them to become mushy. To test see if you can easily push a fork through the potatoes with out breaking the potato apart.


 Now just put in a bowl and enjoy! Seriously, this meal is fantastic! So tasty. You might end up going for seconds… or even thirds.


Monday, March 18, 2013

Chicken Asparagus Pesto Pasta


I love asparagus!!!!  I love love love it!  It is so easy to prepare and is the perfect accompaniment to a grilled steak or a fresh baked ham.  It is a delicious addition to a frittata or, as below, a pasta dish.  Now, I’m going to get this issue out of the way immediately…a lot of freaks won’t eat asparagus because it makes their pee smell funny.  I say, “so what?”   It is pee.  You pee it out and flush it down.  Who really cares it if smells funny?  That’s like saying, “Oh, I don’t want to throw that away, it will make my garbage smell funny.”  Huh? 

My personal favorite way to prepare asparagus is simply drizzling with olive oil, sprinkling with salt and pepper, and either throwing it directly on the grill for a few minutes or into a hot 500 degree oven for a few minutes on a baking sheet.  A quick roasting will ensure a tiny bit of char, but still a nice crisp tender spear full of flavor and void of mush.   It is easy and only takes a few minutes from prep to plate.  As a side note:  If you are going to grill the asparagus, place the spears across the grate so they do not fall through. (Sorry, Mama Kat, the SOB made me do it)

Anyhow, my asparagus featured recipe for the week is Chicken Asparagus Pesto Pasta.  It is something I love, and it is pretty simple to make, but looks like it was difficult, so will impress your dinner freaks (wink wink).  Try it and let us know how you like it!  We always love to hear feedback, success and failure.

Ingredients
2 cups diced cooked chicken
1 bunch asparagus (approximately ¾ - 1 pound)  *read asparagus instructions below
1 10 ounce container mushrooms, sliced
1 pint cherry or grape tomatoes, blistered, * read blistering instructions below
Pesto:  Prepared or fresh.   Mama Lanette is not YOUR mama, only Alyssa JoJo’s.  Do what you want.  A handy tip for farmer’s market shoppers or gardeners, though, is that pesto freezes AMAZINGLY well.  Prepare as normal minus the cheese, spoon into ice cube trays, cover with plastic wrap or foil, and pop into the freezer.  When the time comes to prepare, thaw, add parmesan before serving, and laugh at those fools who pay more than 10 cents a tablespoon for pesto in the wintertime simply because they can’t think ahead (mwah hah hah!)
Parmesan cheese, shredded
Olive Oil, approximately 4 tablespoons for sautéing and blistering
Salt and pepper
½ box pasta, any shape, cooked according to package instructions.

How to prepare:  Heat 2 tablespoons olive oil in a pan on medium heat.  Add asparagus and mushrooms.  Stir to combine with olive oil, and sauté until asparagus is crisp-tender and mushrooms are softened.  The asparagus will turn bright green.  If the asparagus starts turning an avocado green, STOP!!!  You want them to be slightly crisp, not soggy.  Overcooked asparagus is yet another reason why so many people insist they do not like it, much like Brussels sprouts (see Mama Lanette’s former Brussels sprouts blog on this horrible abuse of green veggies).   

Add chicken and pesto.  Stir to combine all ingredients.  Add salt and pepper to desired taste.   Add blistered tomatoes.   Gently combine so tomatoes do not break apart.  Serve over hot pasta and top off with shredded parmesan cheese.  Yummy!!!!!  Hint:  If the finished product seems a bit dry, drizzle with some extra olive oil and stir to combine.


*Asparagus prep instructions:  Rinse asparagus well.  If you are fortunate enough to live in an area that has farmer’s market already going with fresh asparagus, this is IMPERATIVE!!!!!  Rinse and soak….rinse and soak…  A lot of sand can build up in those tasty stalks, and a few extra minutes of prepping can divert an asparapocalypse…get it, hahahaha…  Trim ends from asparagus.  Asparagus ends naturally snap at the point where they are fresh (See Alyssa JoJo’s previous blog; she has a beautiful photo demonstrating this technique.)  Proceed to cutting asparagus spears into 1 to 1-1/2 inch pieces. 

*Blistering tomatoes instructions:  Heat 2 tablespoons olive oil in a pan on medium-high heat.  Add cherry tomatoes.  Let sit until tomatoes start sizzling, shake the pan to turn, or use a utensil.  When tomatoes start getting browned or blackened spots and become slightly wrinkled, they are finished.  Turn off burner and set tomatoes aside.  This is a very fast process.  Do NOT leave the stove to do something else.  If you don’t feel like going to the trouble of dirtying another pan or don’t feel up to the blistering technique, you can always add the tomatoes to the asparagus and mushrooms towards the end of their sautéing.  Just don’t add them at the beginning, or they will soften too much, lose their shape, and turn into a tomato sauce.   You want them to stay intact.  

Tuesday, March 12, 2013

It Ain't Easy Being Green Soup!

So this week's theme is asparagus. It's delicious and nutritious!!! Yeah that's right, I said that. Honestly, I love this little stalk of a vegetable. I love it steamed, roasted, grilled, and any other way you can think of eating it. I really played around this week with my recipe and I hope you all enjoy it as much as I did!


2 bunches of asparagus
2 15 ounce cans of white navy beans
3 medium russet potatoes, peeled and diced
2 cups of chopped broccoli
2 leeks, white and pale part only, diced
1 yellow onion, diced
5 cloves of garlic, minced
2 14.5 cans of veggie stock
2 cups of milk
1 cup of water
2 bay leafs
2 teaspoons of white or black pepper
2 teaspoons of paprika
Salt to taste
2 tablespoons of olive oil


 First we will start by cleaning up the asparagus. To break off the bottom just slightly bend the bottom of the stalk and let it snap where it wants to. It's pretty easy to clean up asparagus and the more you do it you'll find that you know pretty much where it's going to break. Now cut the asparagus into about one inch pieces. 


Take both tablespoons of olive oil and heat up in a decent sized pot. Once warm add in minced garlic and diced onion. We're going to satuee them for about five minutes. You don't have to worry too much about them being a certain texture since we will be cooking them longer. While the garlic and onion is sauteing boil the small amount of potatoes. You will boil these just like you would when making mashed potatoes. You want to make sure that you can get a fork through them easily before taking them off the stove. 


Now take the asparagus, broccoli, and leeks and add them in the pot with the onion with one cup of water. Open both cans of navy beans and drain and rinse well. Add navy beans into pot and stir well and put lid on pot. You're going to check back once every couple of minutes to mix up and to check texture. We want all the veggies to be very soft, almost over steamed.


Once the potatoes are done, they should finish before the veggies, drain and set aside in larger bowl. Once the veggie mixture is done you will also add this to the mixture. Mine finished once all water was out of the pot. 


Now use a blender or food processor to blend together the asparagus, beans, russet potatoes, broccoli, garlic, onion, and leaks. I personally have a small, cheap, food processor. All this means is that I would have to blend the food together about 5 times total and that my soup wouldn't be extremely smooth. I was ok with this - I like chunky soup. Your texture of your soup will depend completely on what appliance you have! 


With veggies being blended add back into pot that you sauteed them in. We will then add both the cans of veggie stock, milk, pepper, salt, paprika, bay leafs, and whatever else seasoning you would want. (We added a good amount of cayenne pepper. We're both sick and the extra kick will help with out plugged noses.) 


Simmer on stove for about half a hour and then serve. Mmm. We both feel in love with this! And the best thing is the left overs will easily freeze! Which is always a bonus in my book.