Showing posts with label feeding the freaks. Show all posts

Friday, August 16, 2013

Egg-cellent Eggplant with Simple Summer Sauce

Egg-cellent Eggplant with Simple Summer Sauce (oh, how I crack myself up!)

Are you a lover of the eggplant?  Are you an “mmm….I kinda like it, but I don’t love it” person?  Do you tend to prefer it dipped in egg, then breadcrumbs, then fried to a glorious brown crustiness and then slathered in marinara and parmesan…HALT!  A delicious and still healthy alternative is about to be revealed!  

Eggplant is one of those veggies that Mama Lanette has been experimenting with in many variations over the years, determined to not just tolerate it, but to really enjoy it and look forward to preparing it and eating it (SOB be damned!).  Every time I stand in line at the grocery checkout lane and the person before me has an eggplant, I just can’t help myself.   I have to ask them, “How do you prepare that?”  Yes, I am one of THOSE people.   After the initial odd look, the resultant answers are varied, none of which have been satisfactory.    I think it is one of those things that unless you grow up eating it on a regular basis, it is a hard one to develop a true fondness for.   Well, hahaha, once Mama Lanette tells herself she is going to like something, she will find a way, oh yes she will.*

Not only is this eggplant the tastiest way I’ve ever cooked it;  creamy, smoky, rich, still somewhat firm in consistency, so it holds own against any sauce you throw upon it,  it is also the EASIEST AND SIMPLIST way I have ever prepared it.  Simply throw the whole thing on the grill and let it sit, only turning it occasionally.  Thank you BA Magazine…you are truly worthy of your subscription fees!    I have included my favorite height of tomato season simple tomato sauce to top it off.   It is literally a tomato bomb exploding in your mouth, or so I’ve been told (and I agree).   I hope you will not be disappointed.  This is truly one to please the eyes and the palate, I believe.   Please try, and as always, we welcome feedback!

Egg-cellent Eggplant
Ingredients
Eggplant.  If a main course, 1 medium eggplant per person. **

Instructions:
Throw a whole eggplant on a grill.  Do not pierce or poke holes, just set entire eggplant, intact, upon the grill at high heat.  Cook it up until it looks gross and all burnt up, approximately 30 minutes, turning carefully occasionally so all sides cook evenly.  Carefully remove from grill and place upon a plate.  Let rest  for a few minutes.  Remove skin, leaving the stem intact.  Let sit for about 20 minutes so juices separate.    That’s it.  Really, that’s it.


Simple Summer Sauce
Makes sauce for two medium eggplants, or for use over pasta, or in Mama Lanette’s world, one eggplant for ML and one serving of pasta for the SOB.

Ingredients:
Cherry Tomatoes, 2 pints.  If you are fortunate to grow your own or have access to a farmer’s market, please utilize!  It makes such a difference in the flavor.  For this blog, I used a combination of sungold and some purple cherry tomatoes.  The sauce was phenomenal in flavor.
Olive Oil, three turns around the pan.
Basil, fresh, from my garden*** (if you don’t have your own fresh, use according to your availability of fresh or dried, and preferred taste)  For this recipe I used approximately ½ cup fresh sliced basil.
Parsley, fresh from my garden (if you don’t have your own fresh, use according to your availability of fresh or dried, and preferred taste)  For this recipe, I used approximately ¼ cup fresh parsley.
Oregano, fresh from my garden (if you don’t have your own fresh, use according to your availability of fresh or dried, and preferred taste)  For this recipe, I used approximately four sprigs of fresh oregano.
Garlic, two cloves, minced or pressed (really, you haven’t gotten a garlic press yet? *judgmental stare*)
Salt to taste
Pepper to taste

Instructions:
After removing eggplant from grill, place cast iron skillet on grill.  Drizzle three turns of olive oil around pan and add tomatoes.  Close lid of grill.  Let tomatoes sizzle and start bursting, opening lid and tossing tomatoes occasionally so they cook evenly.  Once tomatoes are mostly burst, add garlic and 2/3 of basil, oregano, and parsley to top of pan.  Close lid and continue cooking for three more minutes.  Open lid and stir, lightly smashing tomatoes in process.  Don’t overly smash, you want a chunky, rustic sauce, and if you aren’t careful, you’ll squirt yourself in the eye with hot bursting cherry tomato juice…not pleasant. Remove pan from heat (use potholders!).  Add salt and pepper to taste.  Serve over eggplant or pasta.


To assemble eggplant in photo:
Carefully drain excess juices from eggplant.  I drain them into the tomato sauce, as it usually gets pretty thick and can be thinned out a bit anyway.  Using a knife, carefully cut a slit down the middle of each eggplant and spread outwards.  Spoon sauce onto eggplants.  Sprinkle with reserved herbs and some parmesan cheese.  Drizzle balsamic glaze or plain balsamic vinegar on top.  Serve.  Oh my goodness, this is truly delicious and so very good for you at the same time, and it is beautiful at the same time.  ENJOY!!!

Next week,freaks!  <3  Mama Lanette


*Disclaimer:  This has not yet happened with salmon, and yes, Mama Lanette has had it prepared every way known to man, canned, frozen, freshly caught that very morning, grilled, smoked, steamed, etc., please stop telling me I haven’t had it cooked the right way.  All you do is piss me off and make me want to bitch slap you.
** How do I pick a good eggplant?  A good eggplant should feel heavy for its size and be free of bruises and wrinkles. 
***If you don’t have access to fresh herbs and are going to use dried, use half the amount called for in fresh.  For example, ½ cup fresh basil = ¼ cup dried basil.  Also, for this recipe, leave out the dried oregano and just use dried basil and parsley. Oregano is quite strong once dried and needs a bit of time to incorporate.  This is a simple sauce and is quick and easy, just leave it out.  It will still be delicious!

Monday, April 29, 2013

Meatloaf Cupcakes by JoJo

Sometimes you have an idea that is just so amazing that you can't wait to get it going. That's how I feel about this recipe. Now I'm not saying I'm the only one who has done thing, or the only one who has ever come up with this idea, but let's just say that where I'm from, you can't get a meat cupcake! And after doing this all I can say is, *insert caveman voice* meat cupcake gooood.

 Ingredients Set One (Meatloaf Mixture):
2.5 pounds ground meat of choice. You can even mix up some meats. We picked turkey.
One package of bacon. (Again, we did turkey bacon)
3 cups of panko or bread crumbs
Two eggs
One large onion, chopped
2 cups of milk
Salt and Pepper to taste
2 tablespoons of brown sugar
2 tablespoons of dijon mustard
1/3 cup ketchup
4 tablespoons of steak seasoning
4 garlic cloves, minced
6 ounces of cheese of choice (We did a local provolone)

Ingredients Set Two (Barbeque Sauce):
1 cup ketchup
1 cup water
1/2 cup molasses
1/4 cup vinegar
1/4 cup dijoin mustard
2 tablespoons Worcestershire sauce
1 teaspoon of garlic powder
1/4 teaspoon of chili powder
1/4 teaspoon of hot sauce
1 tablespoon of steak seasoning
*Don't be a freaky deek and feel ashamed if you go get yourself a bottle of Famous Dave's or the like in place of creating your own sauce.  Not everybody is up to this, or may have the time.  Sauce sometimes is something that needs to be worked up to in the kithcen skill area.  Do what you feel comfortable with.

Ingredients Set Three (Potato Topping):
3/4 5lb bag of potatoes (3.75 pounds)
1 stick of butter
1/4 cup of milk
Salt and Pepper to taste


First we are going to start by making a BBQ sauce. The ingredients you are going to use are set two of ingredients. Just put all ingredients into a bowl and mix well. You are going to find that this is very... watery? Not really a thick texture. We're going to fix this by placing the BBQ sauce in a pan and letting it simmer on the stove. Make sure to keep your eye on this while working with the other things we're going to do. This should finish up in around 20-30 minutes. DO not boil - we don't want this burning.

 Now peel and cut your potatoes into small pieces. Boil in some salt water. You want to start the potatoes before the meatloaf because we want them at a simi cool state before we start the meat loaf. You'll see why later. Now, one the potatoes can easily be pierced with a fork, drain. Plop down a stick of butter with 1/4 cup of milk in with the drained potatoes and mash well. This is one of those times where you really don't want chunky mashed potatoes. We used a ricer first on just the potatoes, and then a masher with the milk and butter. Smooth, smooth, smooth. Once you get them nice and smooth salt and pepper to taste.

 Once the potatoes are mashed you are going to mix all the ingredients from set one. Yep, that's right! Once again we are just throwing everything together. Make sure to put them all into a decently sized bowl other wise the next part is going to be messier than it already is. Now, stick your hands in and mix everything together! You can try to do it other ways, but this will seriously work the best. Make sure to have a helper around if possible because you may find that you need more bread/panko crumbs. It's way easier to have them dumped them in for you if possible rather than having to wash your hands and add more yourself. Once you have it decently mixed together you can use a wooden spoon to mix it more if you feel the need.

Preheat the oven to 350 degrees. In two giant cupcake pans (6 cupcakes) take 12 strips of bacon and line the tins with it. You can choose to use two pieces of bacon if you want.

Once you have the bacon inserted, fill each hole up halfway with the meat loaf mixture. With your fingers burrow a little bowl into the meatloaf. Make sure you don't go too deep, we don't want to see the pan. Take 1/2 ounce of cheese (your choice) and put it in your little meat bowl. Cover with more meatloaf, making a decent sized cupcake. Once you have 12 healthy looking cupcakes made, put in your oven for 15 minutes.

Now, hopefully you have been watching your BBQ sauce during all of this - stirring often. It should be done around this time. We had ours cook down to about half it's size which gave it the consistency we wanted. Now you can just leave it in your pot if you want to use a spoon later to add to your cupcake, but we put it in a plastic condiment bottle.  You will have leftovers of the sauce.

After you take the BBQ sauce completely off the heat, you should still have some baking time left on your cupcakes o'meat. I spent this time putting my mashed potatoes in a piping bag for frosting cakes. You do NOT have to get this fancy by any means, but I honestly just thought it would be easier. I used one piping bag full per 6 cupcakes.  You can also use a Ziplock bag for this.  Fill the bag, squeeze excess air out, seal, and cut a corner off, voila!  Piping bag!
 
Now we should be close to our 15 minutes being up. Remove cupcakes from oven and frost them with your mashed potatoes. Once done put back into the oven for 15-20 minutes. I know that meatloaf normally takes an hour but remember, this isn't a big loaf. The cupcakes are smaller so they don't need to cook that long. If you are feeling skeptical, keep one cupcake unfrosted that you can cut into to see if the meat is done.

Once cupcakes are done put them onto a plate and drizzle the BBQ over them. Enough to fully cover the cupcake. And there you go! I found this to be easier than I thought it would be! Timing everything can get a little stressful, but the majority of it was just mixing a bunch of stuff together. We did have mashed potatoes left over and ended up eating them on the side. Enjoy carnivorously!

Monday, March 18, 2013

Chicken Asparagus Pesto Pasta


I love asparagus!!!!  I love love love it!  It is so easy to prepare and is the perfect accompaniment to a grilled steak or a fresh baked ham.  It is a delicious addition to a frittata or, as below, a pasta dish.  Now, I’m going to get this issue out of the way immediately…a lot of freaks won’t eat asparagus because it makes their pee smell funny.  I say, “so what?”   It is pee.  You pee it out and flush it down.  Who really cares it if smells funny?  That’s like saying, “Oh, I don’t want to throw that away, it will make my garbage smell funny.”  Huh? 

My personal favorite way to prepare asparagus is simply drizzling with olive oil, sprinkling with salt and pepper, and either throwing it directly on the grill for a few minutes or into a hot 500 degree oven for a few minutes on a baking sheet.  A quick roasting will ensure a tiny bit of char, but still a nice crisp tender spear full of flavor and void of mush.   It is easy and only takes a few minutes from prep to plate.  As a side note:  If you are going to grill the asparagus, place the spears across the grate so they do not fall through. (Sorry, Mama Kat, the SOB made me do it)

Anyhow, my asparagus featured recipe for the week is Chicken Asparagus Pesto Pasta.  It is something I love, and it is pretty simple to make, but looks like it was difficult, so will impress your dinner freaks (wink wink).  Try it and let us know how you like it!  We always love to hear feedback, success and failure.

Ingredients
2 cups diced cooked chicken
1 bunch asparagus (approximately ¾ - 1 pound)  *read asparagus instructions below
1 10 ounce container mushrooms, sliced
1 pint cherry or grape tomatoes, blistered, * read blistering instructions below
Pesto:  Prepared or fresh.   Mama Lanette is not YOUR mama, only Alyssa JoJo’s.  Do what you want.  A handy tip for farmer’s market shoppers or gardeners, though, is that pesto freezes AMAZINGLY well.  Prepare as normal minus the cheese, spoon into ice cube trays, cover with plastic wrap or foil, and pop into the freezer.  When the time comes to prepare, thaw, add parmesan before serving, and laugh at those fools who pay more than 10 cents a tablespoon for pesto in the wintertime simply because they can’t think ahead (mwah hah hah!)
Parmesan cheese, shredded
Olive Oil, approximately 4 tablespoons for sautéing and blistering
Salt and pepper
½ box pasta, any shape, cooked according to package instructions.

How to prepare:  Heat 2 tablespoons olive oil in a pan on medium heat.  Add asparagus and mushrooms.  Stir to combine with olive oil, and sauté until asparagus is crisp-tender and mushrooms are softened.  The asparagus will turn bright green.  If the asparagus starts turning an avocado green, STOP!!!  You want them to be slightly crisp, not soggy.  Overcooked asparagus is yet another reason why so many people insist they do not like it, much like Brussels sprouts (see Mama Lanette’s former Brussels sprouts blog on this horrible abuse of green veggies).   

Add chicken and pesto.  Stir to combine all ingredients.  Add salt and pepper to desired taste.   Add blistered tomatoes.   Gently combine so tomatoes do not break apart.  Serve over hot pasta and top off with shredded parmesan cheese.  Yummy!!!!!  Hint:  If the finished product seems a bit dry, drizzle with some extra olive oil and stir to combine.


*Asparagus prep instructions:  Rinse asparagus well.  If you are fortunate enough to live in an area that has farmer’s market already going with fresh asparagus, this is IMPERATIVE!!!!!  Rinse and soak….rinse and soak…  A lot of sand can build up in those tasty stalks, and a few extra minutes of prepping can divert an asparapocalypse…get it, hahahaha…  Trim ends from asparagus.  Asparagus ends naturally snap at the point where they are fresh (See Alyssa JoJo’s previous blog; she has a beautiful photo demonstrating this technique.)  Proceed to cutting asparagus spears into 1 to 1-1/2 inch pieces. 

*Blistering tomatoes instructions:  Heat 2 tablespoons olive oil in a pan on medium-high heat.  Add cherry tomatoes.  Let sit until tomatoes start sizzling, shake the pan to turn, or use a utensil.  When tomatoes start getting browned or blackened spots and become slightly wrinkled, they are finished.  Turn off burner and set tomatoes aside.  This is a very fast process.  Do NOT leave the stove to do something else.  If you don’t feel like going to the trouble of dirtying another pan or don’t feel up to the blistering technique, you can always add the tomatoes to the asparagus and mushrooms towards the end of their sautéing.  Just don’t add them at the beginning, or they will soften too much, lose their shape, and turn into a tomato sauce.   You want them to stay intact.  

Sunday, February 24, 2013

Tortilla-Topped Tilapia for Two (or more)


Tortilla Tilapia for Two

Let me start off by saying, I do NOT like touching, cooking, or eating raw fish!  (See how I capitalized, bolded, and italicized that font?  I don’t just throw that “I don’t like that” sh#@ around, freaks!)  Take this blog post as a lesson that anybody can grow to love (or at least tolerate) a fish dish. 

Growing up in a rural, lake-filled, Midwestern household, we ate fresh-caught bluegill or walleye that was oh-so-carefully pan fried, or battered and deep fried, at a minimum of once a week.  It was freshly caught, and yet for my Barbie-doll-loving, encompassing-all-that-is-pink, girly-girl self, participation in anything past catching and reeling it in came to a screaming halt.  No brutally ripping the day’s catch off the hook, gutting, or filleting for this gal, oh no oh no oh no…*Sorry, I just threw up in my mouth a little bit.*  As an adult, I have come to the eventual realization that my “fishing with daddy” excursions were not so much to enrich my life experiences, but more to increase his daily catch limit. He will neither deny, nor confirm this theory of mine, but I know it’s true… To this day, my perfect fillet o’fish consists of a heavily beer-battered fillet, doused in malt vinegar, and covered with a thick blanket of tartar sauce; and served with a loaded baked potato on the side…not a very healthy adaptation of the food, but one I love nonetheless.  If I have the opportunity taste a fillet that has been freshly dusted in cornmeal and flour, then pan fried to crispy perfection by my Daddy-O, I am all over it.  That man can prepare a venison tenderloin or a fish fillet for me that defies all taste odds…I just cannot do it.  I have tried, and have come to the conclusion that there are some things better left to the elders for posterity’s sake.  

In what seems like a never-ending quest to find a somewhat healthy, non-fried, non-battered, but still tasty, fish dish for me and the SOB, I created this Tortilla Tilapia for Two recipe.  I was given the challenge by Alyssa JoJo, so what could I do?!?!?  I will say, though, I quite liked this recipe, and with an extra squeeze of lime or lemon on top (or the below-mentioned lemon-lime beer salt), I did not need to douse it in tartar sauce, and that is saying something from my perspective.  Please try, enjoy (or not), and send us some feedback.  We love our freaks and aim to please <3

Ingredients for Two
Double or triple recipe accordingly for number of servings made

2 tilapia fillets
1 cup crushed corn tortilla chips (for an extra splash of white trash, use Nacho Cheese or Cool Ranch Doritos and omit other spices)
2 fresh limes, juiced
1 tablespoon dried cilantro, or ¼ cup fresh cilantro
½ teaspoon chili powder
¼ teaspoon cumin
1 teaspoon salt; lemon or lime flavored if you can find it (which I HAVE, but found somewhere in Texas in a gas station between San Antonio and Corpus Christi next to a cooler full of beer—they dress their beer bottles, similar to salting the rim of a margarita glass)
1 egg

Instructions
Preheat oven to 375 degrees. 

In a shallow bowl, mix together tortilla crumbs, lime juice from 1 lime, cilantro, and spices.  For maximum mixture, place ingredients into a food processer and pulse until combined.  If anybody who is going to eat this does not like cilantro, use parsley instead.  (Trust me, cilantro haters can detect one single leaf of cilantro in an entire dish, so don’t waste your time thinking, “oh, they won’t notice that if I don’t tell them it’s in it”.  It doesn’t work, and it’s just not worth it.)

In a separate bowl, beat egg.  BAM!  That’s it…easy enough, right?!?!?

Dip tilapia fillet in egg, then in tortilla crumb mixture, pressing crumbs to adhere.  Repeat with remaining fillet(s).  Yes, it is icky, but if you use tongs, it ain’t so bad.

Carefully place tilapia fillets onto a baking sheet.  Press more tortilla crumb mixture on top if needed (not too much or it won’t get crispy, but you want a nice even layer and not be able to see the fish through the breading).  Place in oven and bake for 15 minutes.  If fillets are thick (more than ½ inch) check after 15 minutes.  If fillets easily flake with a fork, they are done.  If not, bake another couple minutes or so.

After removing from oven, and immediately before serving, squeeze juice from one lime over fish fillets.  I served this with a salad of arugula and segmented grapefruit, but oranges would work just as well and probably be a little sweeter.  I then drizzled olive oil and orange champagne vinegar (from TJ’s, yo) over the salad, and sprinkled with a liberal dose of salt and pepper.  That is all it takes to make a salad, freaks!  Stop whining that you can’t get your veggies in.  I know you’re just not trying…  It was a nice, refreshing combination during the SAD season that has so cruelly and predominately raised its evil head and invaded this late winter in the Midwest, as it always does…

Truly, though…this was an incredibly easy recipe to prepare, and I highly suggest making it if you find yourself in a fish rut and would like to try something different.

Next week, Freaks!
 <3 Mama Lanette

Wednesday, February 20, 2013

Lime Tilapia!

Hey everyone! Sorry that this late but we've been busy busy in JoJo land. It was tax return time so we bought a lot of stuff that was needed for the house, and a lot of stuff that was not so needed. Now this recipe doesn't have pictures, but that doesn't mean it's not good.

Ingredients:
4 tilapia fillets
Juice and Zest of 1 lime
1 tablespoon of olive oil
1 1/2 tablespoons of honey
1/2 teaspoon pepper
1/2 teaspoon of garlic powder
1/4 teaspoon of chili powder
1/2 cup of flour
Olive oil for frying

Combine lime juice and zest, olive oil, honey, pepper, garlic, and chili powder in a larger zip-lock bag. Add tilapia fillets and let marinate for at least 1 hour. You can let this sit for a day but with it being fish I would not do it any longer than that.

When fish is ready combine flour with some salt and pepper (if wanted) and lightly cover tilapia with flour on both sides. Heat about 2 tablespoons olive oil, and cook about 4 minutes on each side; until the flour becomes and nice brown. You don't want to flip or move around too much.

See?! Look at that easy recipe. And very tasty. We served with some brown rice and some asparagas on the side. Yum!!!!


xoxo
Alyssa JoJo

Monday, February 11, 2013

JoJo's Lasagna


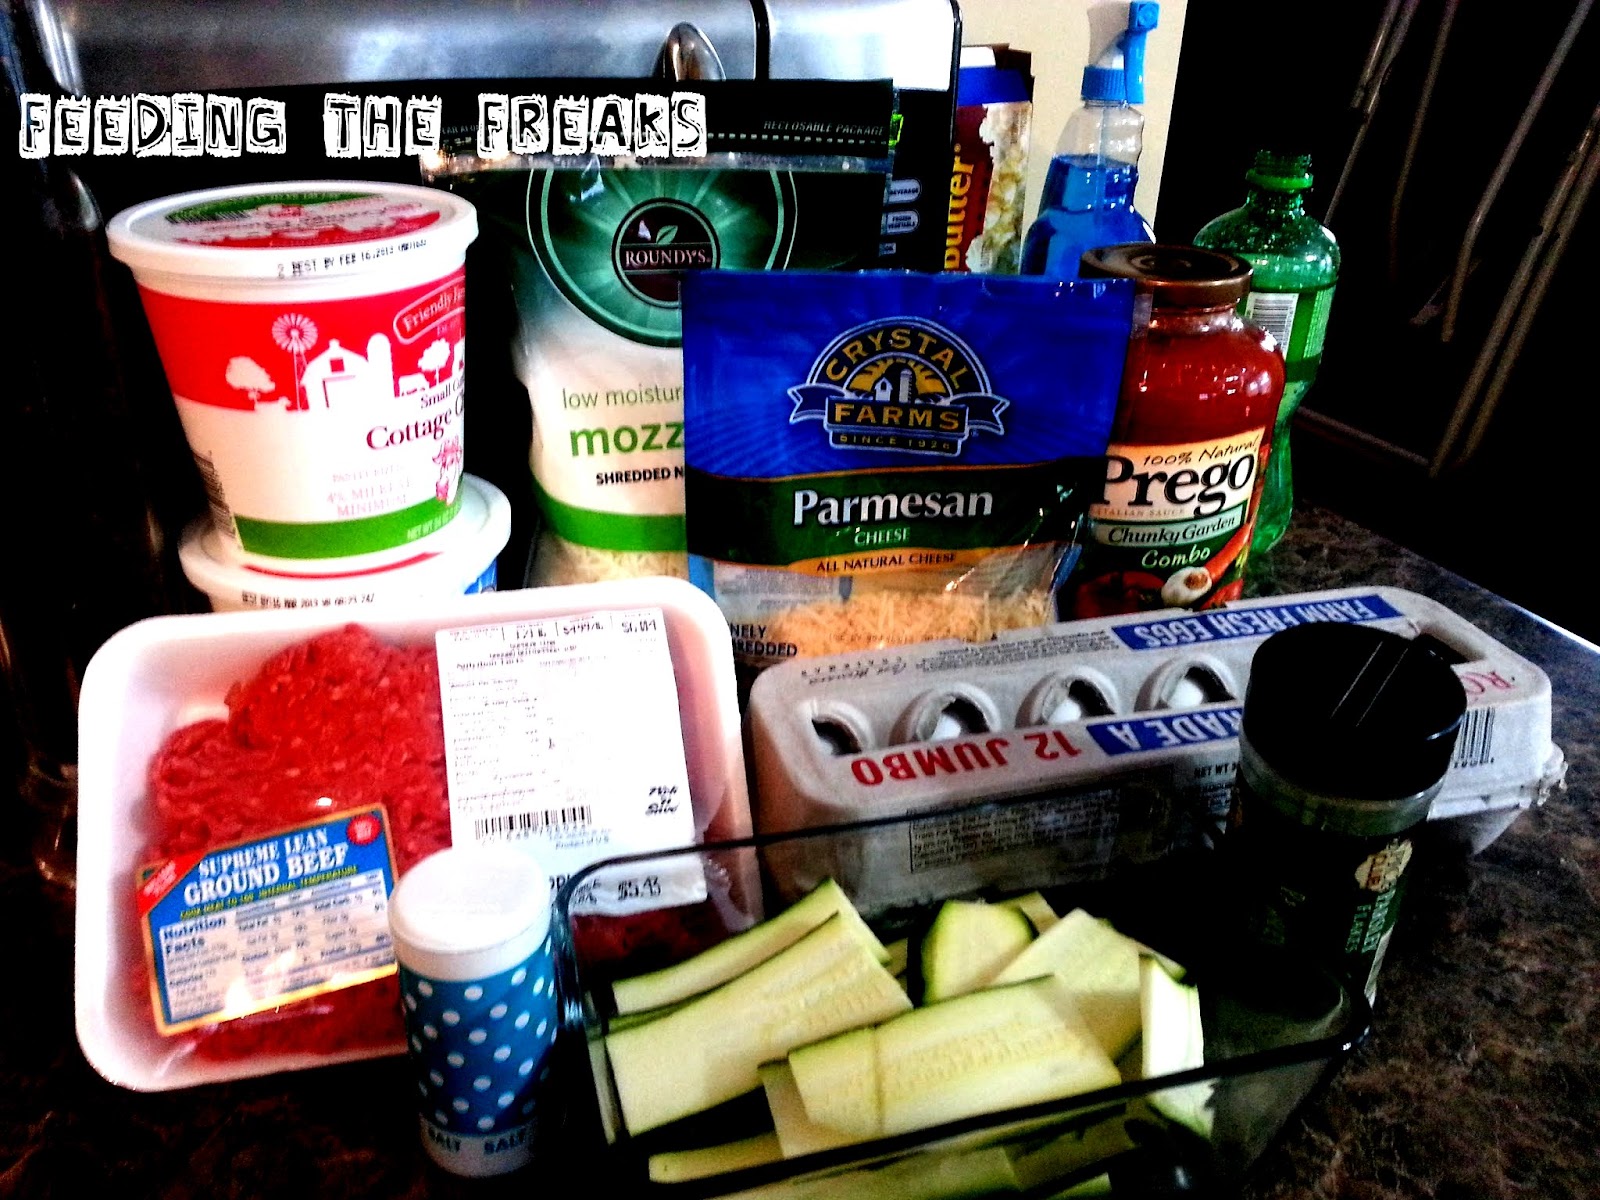
Hello everyone! This week we are making lasagna and let me say – mine turned out to be a fail. Not taste wise, it was very tasty, but all together structure wise it didn’t turn out. I’m still posting it though, if only to show that you can always work with the food that turns out in a way that you completely didn’t want. First I’m going to start with the recipe for the lasagna alone. I tried doing something that I’ve been seeing online a lot, where you replace the noodles with zucchini. Here we go!

Ingredients:
1lb lean ground beef (Can use turkey if you’d like)
45 oz jar of spaghetti sauce
2 cloves of garlic, minced
32 oz of cottage cheese
4 cup mozzarella cheese, shredded
2 eggs
½ cup grated parmesan cheese
2 teaspoons dried parsley
Salt and Pepper to taste
4 medium to large zucchinis


First we will start with the zucchini! Now if you have a tool like a mandolin this is where your job gets easy. I personally don’t have one so I used a simple knife to cut it up into decent sized slices. You might have to come back and do this – I at first only cut up two and found that I needed to use four for mine.


Next we will put the ground beef into a decent sized pot and brown it. I added a little bit of salt and pepper in when I did this part. Once it’s fully cooked drain all the grease and put back into pot.


Now add the spaghetti sauce and the minced garlic in with the ground beef. Mix the ingredients well while bringing to a slight boil. Once it hits the boil bring down to a simmer and let cook for five minutes.


While the beef mixture cooks preheat your oven to 450 degrees. Grab cottage cheese, half of the mozzarella cheese, both eggs, half of the parmesan cheese, the parsley, and the salt and pepper. Mix well and set aside until the beef mixture is done.


Take enough of the beef mixture to have a thin layer covering fully a 9X13 pan. Then layer some of the sliced zucchini to cover the bottom as best as you can.


Now layer some of the cottage cheese mixture and then some of the beef mixture. To figure out how much you should use figure out how many layers you want. I did two layers so I did half and half. You will then put on another zucchini layer and continue until you run out of both mixtures. Top with remaining mozzarella and parmesan cheese.

Bake for 45 minutes.

Now look at that finished product… yup it pretty much looks like soup. The BBB (aka Big Burley Boy aka the bf) and his pop still ate it up. Seconds and all – but it just was NOT right. It bugged me so I plotted how to fix it and after much thought I figured out how to. I boiled a pot of macaroni noodles that I had left over from the mac n cheese night. As those were boiling I pulled all the zucchini slices from the lasagna and chopped them up to smaller chunks. I put them, the lasagna mixture, added about a tablespoon of chili powder, some garlic powder, salt and pepper, and heated it up. By the time the noodles were done the lasagna soup was fully heated up. Mixed it all together and voila! We ate that with a side of ghetto cheesy garlic bread and it was an amazing dinner.

So, keep in mind, Freaks....every meal is not going to be a win-win situation.  There will always be instances in which a new recipe just FAILS for some reason or another.  It is the truly adaptable cook who can take a fail and turn it into a WIN.  Sometimes the conversion becomes a new family favorite, so go for it...you never know what is awaiting you!  

Monday, February 4, 2013

Alyssa JoJo's Mac-N-Cheese

 I think we can all agree that mac n cheese is one of the most amazing things around. Once you walk away from the chalky version that comes in a blue box, a completely new world of what macaroni and cheese IS MEANT TO BE opens up in front of you, and yes, golden gates and singing angels are included.

This week Mama Lanette and I both attack mac n cheese.  This is a recipe I've been making for a couple of years now and has made me a total Mac N Cheese snob. Everyone I have fed this to has drooled over it, and I personally think that it's super super easy to make. (Mama Lanette thinks that her's is easier but I think she's starting to get old and senile) So bring out your noodles and find what version you like most!

 Ingredients: 
8 oz elbow macaroni
8 oz cheddar cheese (shredded) 
12 oz small curd cottage cheese 
8 oz sour cream 
1/4 c grated Parmesan cheese 
1 c dry panko crumbs 
1/4 c butter, melted 
Salt and Pepper to taste


Bring a large pot of water with a little bit of salt to a boil and then add macaroni. Stir occasionally until noodles are fully cooked. Drain and put back into large pot.


Preheat oven to 350 degrees. Mix together cheddar cheese, Parmesan cheese, cottage cheese, and sour cream with noodles. Put into any pan that you would like. I did a large muffin pan with a mini bread pans. Before that, all I used was a 9X18 cake pan. Just do whatever makes sense to you.


Melt butter and mix with panko crumbs. Sprinkle over the mac n cheese for a nice crispy crust.


Bake at the 350 degrees for 30 to 35 minutes. Bring out a big bowl and eat as much as you can. Goes well with a nice green side. (We did broccoli bites.) And if you make this, please tell us what you think! xoxo Alyssa JoJo

Monday, October 29, 2012

Spaghetti Brain (Braided Spaghetti)

Now if you're like me you are addicted to Pinterest... and that is exactly where I got this idea. There are plenty of things you can do with this to make it fun for Halloween. Like coloring the dough red or anything along those lines. Now this recipe isn't as picture heavy as our normal ones just for the fact that I was baking so many things at the time that I totally forgot to take some of the pictures. But this is something that is totally worth making. Everyone loved it and it was way easier than I thought it was going to be.

Ingredients:
1 loaf of frozen bread dough. (I used Rhodes)
6 ounces of spaghetti, cooked
1 cup of thick spaghetti sauce
8 ounces of mozzerlla cheese
Parmesan cheese
Parsley flakes


First thaw out your loaf of bread. Place some flour on a table and slowly roll out the dough until it's about the same size as a cookie sheet. This may take some time since the frozen loaf already has it's shape - but if you take your time with it, it will soon flatten out.


Once your dough is flattened out, lay it on a cookie sheet, and with a pair of kitchen scissors cut some slices on the edge; making sure they are about 1 inch thick tabs. We will be using these to make the braided look once the bread is full. Lay about half of the cheese down, then the cooked noodles, then the spaghetti sauce, and end with the remaining cheese.


Once everything is layered in on each end take your end tabs and lay them straight down over the spaghetti. Then take the remaining tabs on the side and slowly layer them over each other to make them look braided. Sprinkle with Parmesan cheese and parsley flakes.


Bake at 350 degrees for around 30-35 minutes. (Until the bread is a nice golden brown) Cool slightly and then cut into 6 pieces for serving.


Now, like I said there are many things you can do to this recipe to make it yours. Add pepperoni and do it pizza style. You could do chicken, broccoli, and cheese to veer from the Italian mood completely. No matter what this is something that will always be delicious, and the people you feed it to will believe that you spent a lot of time making them dinner! It's a win win situation.